What is BIMI? How It Works, Setup Steps, and Costs (Updated 2026)

BIMI (Brand Indicators for Message Identification) is an email specification that displays your brand logo next to your authenticated messages in supporting inboxes like Gmail, Apple Mail, and Yahoo Mail. When your email passes DMARC, the mailbox provider fetches your logo from a DNS record and shows it beside the message.
Think of the inbox as the Wild West, and the logo as your badge: proof to your subscribers that the message really came from you.
BIMI has changed meaningfully since 2024. Gmail now displays logos for brands without a registered trademark, certificates come in three tiers at three price points, and the sender rules that made DMARC mandatory for bulk senders removed BIMI’s steepest prerequisite. Here’s everything you need to know about BIMI and how to set it up, updated for 2026.
What is BIMI?
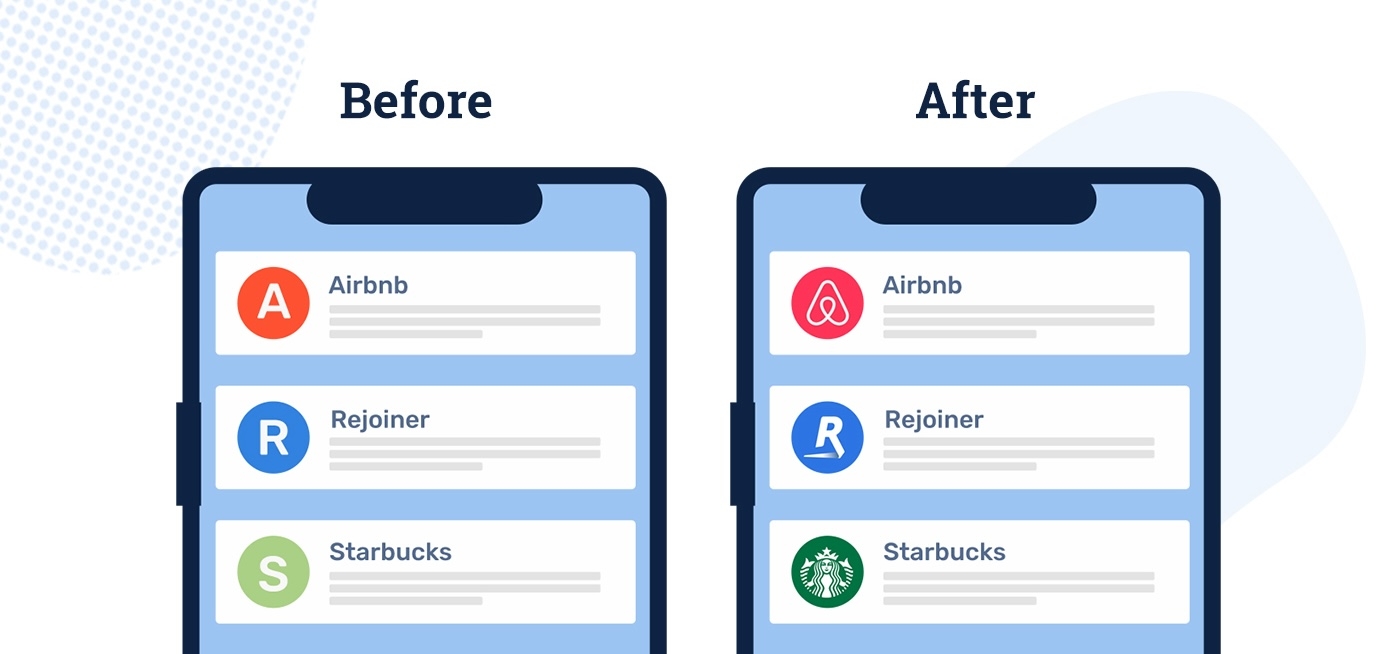
BIMI (pronounced bih-mee) stands for Brand Indicators for Message Identification. It’s an email specification that allows email inboxes to display your brand’s logo next to your authenticated messages. Put simply, it puts your logo beside your emails, verifying that your messages are your own.
Here’s a visual example:
BIMI After the 2024 Gmail and Yahoo Sender Requirements
In February 2024, Gmail and Yahoo began requiring bulk senders (5,000+ messages a day) to authenticate their email with SPF, DKIM, and DMARC. That changed the BIMI math. DMARC enforcement used to be BIMI’s steepest prerequisite; now it’s table stakes work most senders have already done just to keep reaching the inbox. Mailgun’s deliverability research found 53.8% of senders have implemented DMARC, up from 42.6% in 2023.
In other words: if you bulk-send to Gmail or Yahoo, the hard part of BIMI is compliance work you’ve likely already finished. BIMI is the visible payoff.
3 reasons why you need BIMI.
If you have any experience as a marketer, I’m sure you can immediately see the immense value of implementing BIMI into your brand’s email marketing efforts. Regardless, here’s three compelling reasons as to why you need BIMI:
1. Enhanced Brand Visibility
It’s no surprise that brands that use BIMI are increasing their visibility in their customers’ inboxes. Having your logo displayed prominently beside your emails is eye-catching and sets your communications apart from the sea of competition. Red Sift’s research found that showing a registered logo in the avatar slot of an email increased opens by 38%.
2. Increased Trust and Security
As mentioned earlier, email inboxes can be a scary and chaotic place. Marketers who use BIMI are showing their community that they care about their customers by exemplifying trust and security. Your customers already have to worry about spam, scams, and phishing attempts, they shouldn’t have to worry about your emails, too. The presence of a BIMI logo acts as a symbol of trust, assuring subscribers that the email is indeed from the displayed brand.
3. Improved Email Engagement Rates
We’ve told you how BIMI increases visibility and trust, both of which increase clicks. But what about once customers are in the actual emails? The measured lifts here are modest but real. Red Sift customer TalkTalk reports 4-6% better email engagement from implementing BIMI, and Yahoo’s early pilot pointed the same direction. BIMI isn’t just getting people to open more emails, it’s improving how they engage once they’re there.
BIMI Certificate Types: Self-Asserted, CMC, and VMC
Until late 2024, getting your logo into Gmail required a Verified Mark Certificate (VMC), and a VMC requires a registered trademark. That changed in September 2024, when the BIMI Group introduced Common Mark Certificates (CMCs) with official Gmail support. There are now three tiers:
Tier | Trademark required? | What you get | Who displays it |
|---|---|---|---|
Self-asserted (no certificate) | No | Free logo display at a limited set of providers | Yahoo, Fastmail, La Poste |
Common Mark Certificate (CMC) | No. Evidence of prior public logo use suffices | Logo display at Gmail and other supporting providers, without Gmail’s verified checkmark | Gmail and other certificate-tier providers |
Verified Mark Certificate (VMC) | Yes. Registered trademark or government mark | Logo display plus the blue verified checkmark in Gmail | The full support set, including Gmail, Apple Mail, and Yahoo |
Tier | Self-asserted (no certificate) |
|---|---|
Trademark required? | No |
What you get | Free logo display at a limited set of providers |
Who displays it | Yahoo, Fastmail, La Poste |
Tier | Common Mark Certificate (CMC) |
|---|---|
Trademark required? | No. Evidence of prior public logo use suffices |
What you get | Logo display at Gmail and other supporting providers, without Gmail’s verified checkmark |
Who displays it | Gmail and other certificate-tier providers |
Tier | Verified Mark Certificate (VMC) |
|---|---|
Trademark required? | Yes. Registered trademark or government mark |
What you get | Logo display plus the blue verified checkmark in Gmail |
Who displays it | The full support set, including Gmail, Apple Mail, and Yahoo |
Every tier rests on the same technical baseline: an HTTPS-hosted SVG logo (SVG Tiny 1.2 Portable/Secure), a BIMI DNS record, and DMARC at an enforcement policy (p=quarantine or p=reject). The BIMI Group’s guide to certificate types has the full breakdown. One detail worth knowing before you choose: per Google’s BIMI documentation, the checkmark next to the sender name in Gmail appears only for senders verified with a VMC. A CMC displays your logo without it.
How do you set up BIMI?
At this point, you know everything you need to know about BIMI and how it will take your email marketing to the next level.
The next step is obvious: you need to learn how to set up BIMI for your brand.
Luckily, we’ve got everything you need to get there.
Here’s our step by step guide to go from BIMI-less to BIMI-yes.
Step 1: Authenticate, authenticate, authenticate.
Before implementing BIMI, you must have the following email authentication measures properly configured:
SPF (Sender Policy Framework): Validates that the sending server is authorized to send emails on behalf of your domain.
DKIM (DomainKeys Identified Mail): Ensures the email content is not tampered with from the time it was sent.
DMARC (Domain-based Message Authentication, Reporting, and Conformance): Uses SPF and DKIM to determine the legitimacy of an email message, and instructs email providers on how to handle emails that don’t pass the checks.
To set up BIMI, you need to have DMARC. And to set up DMARC, you need to have SPF and DKIM.
Setting up SPF, DKIM, and DMARC can be a tough process. Scroll to the bottom of this blog for a comprehensive guide to setting up each of these essential authentication measures. And if you’re standing up a new sending domain or IP at the same time, pair authentication with a proper IP warming plan.
Step 2: Choose your Certificate Path
You no longer need a registered trademark to use BIMI. What you need is to pick the path that matches your logo’s status:
- Registered trademark (or government mark): get a VMC. It’s the only tier that adds Gmail’s verified checkmark.
- No trademark, but your logo has an established history of public use: get a CMC.
- Neither, or you just want to test the waters: self-assert with no certificate and your logo can display at providers like Yahoo for free.
If you’re going the VMC route, you can check whether your logo is trademarked on the USPTO’s trademark site.
Step 3: Create your BIMI Record
BIMI leverages a specific DNS TXT record. Here are the elements you need for your BIMI record:
- SVG Logo: Your brand logo needs to be in SVG format, meeting specific criteria such as a square aspect ratio, a solid background, and compliance with the SVG Tiny 1.2 Portable/Secure specification.
- Certificate (VMC or CMC): Gmail and Apple Mail require a certificate to display your logo, and since late 2024 Gmail accepts CMCs alongside VMCs. The certificate verifies your logo’s authenticity. To get one you need to:
- Choose a Certificate Authority that issues VMCs and CMCs (Entrust or DigiCert, for example)
- Submit your organizations for verification
- Submit a domain for verification
- Submit your trademark for verification (VMC) or evidence of prior logo use (CMC)
- Once the logo is ‘certified’ from a certificate authority then you can continue
- Choose a Certificate Authority that issues VMCs and CMCs (Entrust or DigiCert, for example)
Step 4: Publish your BIMI Record
You will need to add a TXT record to your DNS settings. The format generally looks like this:
default._bimi.yourdomain.com TXT "v=BIMI1; l=https://yourdomain.com/yourlogo.svg; a=optionalVMCLink"
Where:
v=BIMI1specifies the BIMI version.l=is the URL to your SVG logo.a=is the URL to your VMC, if applicable.
Step 5: Test and Validate your BIMI
After setting up your BIMI record, it’s crucial to test and validate that everything is working as expected. After all, if it doesn’t work for your customers, what good does it do?
Use tools like the BIMI Group’s BIMI Generator and Inspector tools to verify your BIMI implementation. It might take some time for the changes to propagate and for the logos to start appearing in email clients.
In addition, you should test it yourself by simply sending a test email!
Preflight Checklist
As seen, setting up BIMI is a bit of a process. Between the authentication measures, the logo standards, and testing, ensuring BIMI runs smoothly for your brand can be tricky.
To give you a quick snapshot of what you're getting into, I'm going to give you a small checklist of items to consider before you begin setting up BIMI.
Ensuring a Smooth Setup
Setting up BIMI can be a tough process if you have no IT experience. It requires some attention to detail along with careful testing. Missteps in configuration can lead to email deliverability issues, where legitimate emails are marked as spam or, worse, not delivered at all.
Solution: Carefully follow the process! Don’t try taking any shortcuts as it will only harm your brand in the long run. Invest a solid chunk of your time into setting up BIMI and your investment will pay off. Also, do yourself a favor; ask your IT team for help.
Setting BIMI up on a Different Domain
When you set up your BIMI, it overrides all other profile pictures on your domain. What exactly does this mean? I'll give you an example that we actually experienced ourselves. When we set up BIMI for the Knak domain (your.name@knak.com), it put our BIMI logo on everyone's email address — meaning anyone who had a profile picture was overridden by BIMI. There was no way to override it.
Solution: Publish BIMI on a different domain than that of your team's. Although we couldn't override our BIMI logo taking precedent, we instead published it on an account called your.name@team.knak.com, which gave everyone at Knak the ability to display their profile picture again.
What Does BIMI Cost? VMC, CMC, and Free Paths
What BIMI costs depends on the path you chose in Step 2. Self-assertion is free: publish the record and supporting providers like Yahoo can display your logo with no certificate at all. VMCs have typically run in the $1,000 to $1,500 per year range for a single logo (the pricing we found when this guide first ran in 2024), and CMCs are the newer, lower-cost option. Issuers like Entrust and DigiCert sell both and quote current pricing.
Solution: Weigh the payoff against the tier you actually need. If you don’t hold a trademark, you’re no longer priced out; a CMC or free self-assertion still gets your logo into inboxes. And the upside is real: a 38% opens lift in Red Sift’s research, and 4-6% better engagement reported by Red Sift customer TalkTalk.
Adoption Rates
Not every email client supports BIMI, and sender adoption is still early. URIports’ analysis of the top 1 million domains found BIMI adoption grew 28% in eight months, from 7,562 domains in May 2024 to 9,661 in January 2025. The same analysis found 53.6% of BIMI-enabled domains have at least one implementation error, most commonly a non-compliant SVG, so a careful setup puts you ahead of half the field.
Solution: Rather than a solution, some perspective. Do all email clients support BIMI? No, and Outlook is the big gap. But the major consumer providers, Gmail, Apple Mail, and Yahoo among them, do. BIMI is still worth it and has real impact on the customers who see it. Here is a list of all clients that do and do not support BIMI.
Which Email Providers Support BIMI?
Per the BIMI Group’s documentation on where BIMI logos are displayed, mailbox providers that display BIMI logos include Gmail, Apple Mail, Yahoo Mail, Fastmail, La Poste, au (KDDI), and Zone. The full list is longer and changes over time; the BIMI Group maintains a living support infographic (last updated May 2025) tracking which providers support BIMI and which are considering it.
Does Outlook Support BIMI?
No. Microsoft does not appear on the BIMI Group’s list of supporting mailbox providers and has not announced BIMI support for Outlook. Outlook relies on its own sender verification systems instead. If Outlook inboxes dominate your audience, as they do at many B2B-heavy companies, your BIMI logo won’t reach them yet. For consumer-heavy lists, the major providers are covered.
What About Apple? BIMI and Branded Mail
Apple Mail displays BIMI logos for certificate-backed senders. Apple also runs its own separate logo program, Branded Mail, managed through Apple Business Connect, which can put your logo in Apple inboxes independently of BIMI. If Apple users are a big share of your audience, it’s worth registering for both; see our guide to Apple’s email changes in iOS 18 and Sequoia for the Apple-side picture.
BIMI FAQs
Quick answers to the most common BIMI questions.
What does BIMI stand for?
BIMI stands for Brand Indicators for Message Identification. The specification is developed by the AuthIndicators Working Group, better known as the BIMI Group.
Do you have to pay for BIMI?
Not necessarily. Publishing a BIMI record and an SVG logo costs nothing, and self-asserted logos display at providers like Yahoo with no certificate. You pay only for certificate-backed display: a CMC (lower cost, no trademark required) or a VMC (higher cost, registered trademark, adds Gmail’s verified checkmark).
Is BIMI worth it?
For most bulk senders, yes. The prerequisites (SPF, DKIM, and DMARC at enforcement) are already mandatory for reaching Gmail and Yahoo inboxes at scale, so the incremental work is the logo, the DNS record, and optionally a certificate. In exchange, your brand shows up verified in the inbox on every send.
Can BIMI be spoofed?
BIMI is hard to spoof by design. Your logo only displays when a message passes DMARC authentication at an enforcement policy, so a spoofer sending from your domain fails authentication and shows no logo. That is the point: the logo is a trust signal precisely because it rides on authentication.
How long does BIMI take to work?
Once your DMARC enforcement, SVG logo, BIMI record, and (optional) certificate are in place, DNS changes typically propagate within a day. Mailbox providers may still delay logo display while they evaluate your domain’s sending reputation, so allow anywhere from a few days to a few weeks for consistent display.
BIMI and Beyond
So where does BIMI leave you? With a verified logo on every send, an opens lift Red Sift measured at 38%, and the kind of inbox-level brand recognition we flagged as a defining shift in our 2026 email marketing trends. In an inbox where AI increasingly filters and summarizes before a human ever reads, a verified visual identity is one of the few signals that cuts through.
But perfecting your email marketing game goes far past displaying your logo in customer inboxes. I’m going to tell you an obvious (but not so obvious for everyone) reality; arguably the most important component in your email marketing game is the emails themselves!
Let me paint a picture for you.
No-code, drag and drop email building. Collaborative tools where your team can work on campaigns in real time. Custom brand guardrails. Integrations with every major marketing automation platform on the market. AI tools. Need I continue?
There’s plenty more, if you’re interested. Learn more about Knak and the future of campaign creation.
How do you set up SPF, DKIM, and DMARC?
Setting up these email authentication measures can be tough. Because we care about you and a utopia where all emails have the proper security protocols, we’ve put together guides on how to set up SPF, DKIM, and DMARC. (These standards exist because spam forced their invention; the history of email spam traces that whole arms race.)
Guide to setting up SPF
1. Identify Outgoing Mail Servers
Determine all the mail servers and services that send emails on behalf of your domain. This could include your company's main mail servers, third-party email service providers like Marketo, Eloqua, Mailchimp, or any servers sending notifications on behalf of your domain.
2. Create the SPF Record
The SPF record is a TXT record in your domain's DNS settings. It specifies which servers are allowed to send email from your domain.
An example of a basic SPF record might look like this:
v=spf1 ip4:192.168.0.1 include:_spf.google.com -all
In this example, ip4:192.168.0.1 specifies an IP address authorized to send emails. include:_spf.google.com allows emails sent from servers authorized by Google’s SPF records. The -all mechanism is a hard fail, indicating that emails from sources not explicitly authorized should be outright rejected.
3. Publish the SPF Record
- Log in to your domain registrar’s DNS management tool.
- Navigate to the section where you can manage DNS records.
- Add a new TXT record with the value you formulated in the previous step.
4. Test your SPF Record
After publishing the SPF record, it's important to ensure it is correct and functioning as intended. You can use online tools like MXToolbox to verify your SPF record. Simply enter your domain, and it will check if your SPF record is valid and correctly implemented.
5. Monitor and Maintain
Keep track of any changes in the email services or servers you use. Whenever changes occur, update your SPF record accordingly to ensure all legitimate sources are included, and unauthorized ones are excluded.
Guide to Setting Up DKIM
1. Generate DKIM Pair
The first step is to generate a public-private key pair. The private key will be used by your outgoing mail server to sign your emails, and the public key will be published in your DNS records for recipient servers to verify the signature.
Many email service providers (ESPs) offer tools to generate these keys, or you can use open-source software like OpenSSL if you are managing your own mail server.
2. Create your DKIM Record
Once you have your public key, you need to create a DKIM TXT record for your DNS. This record will look something like this:
mail._domainkey.yourdomain.com TXT "v=DKIM1; k=rsa; p=YOUR_PUBLIC_KEY_HERE"
Here, mail is the selector that specifies which DKIM public key to use if you have multiple keys. v=DKIM1 specifies the DKIM version, k=rsa indicates the key type, and p=YOUR_PUBLIC_KEY_HERE is where your actual public key goes.
3. Publish the DKIM Record
- Log into your domain's DNS management panel.
- Add the TXT record you created to your DNS settings. This process can vary depending on your DNS provider or web host, so refer to their specific instructions if available.
4. Configure your Email Server
Configure your email server or ESP to use DKIM by enabling DKIM signing and specifying the private key. This setup will depend heavily on the software or service you are using. For instance, platforms like SendGrid, Postfix, or Microsoft Exchange have their own methods and interfaces for setting up DKIM.
5. Test your DKIM Setup
After setting up DKIM, it’s crucial to test and ensure that it's working correctly. Tools like DKIMValidator or MXToolbox provide online DKIM check services where you can send a test email to their addresses, and they will analyze whether the DKIM signature is valid.
6. Monitor and Maintain
Regularly check your DKIM setup to ensure it continues to function correctly. Keep your DKIM keys secure, and consider rotating them periodically for enhanced security.
Guide to Setting Up DMARC
1. Ensure SPF and DKIM are in Place
Before setting up DMARC, make sure you have SPF (Sender Policy Framework) and DKIM (DomainKeys Identified Mail) records already set up for your domain. DMARC relies on these two forms of email validation to function correctly.
2. Create your DMARC Record
DMARC records are published in DNS as TXT records. The DMARC record begins with v=DMARC1, which specifies the DMARC version.
Here’s a basic example of what your DMARC record might look like:
v=DMARC1; p=none; rua=mailto:postmaster@yourdomain.com
p=none tells email receivers to take no action against emails that fail DMARC checks but to report them. This setting is recommended when you are first implementing DMARC so you can monitor the effects without impacting delivery.
rua=mailto:postmaster@yourdomain.com is where aggregate reports of DMARC failures will be sent.
3. Publish the DMARC Record to your DNS
- Access your DNS management console provided by your domain registrar.
- Add a TXT record for
_dmarc.yourdomain.com. with the value you created in the previous step.
4. Choose the Right Policy
- The
p= tagin the DMARC record defines the policy. Options include:none(monitor only, no action taken on failures)quarantine(treat failed emails suspiciously, usually by moving them to the spam folder)reject(block failed emails entirely)
- Start with
p=noneto avoid disrupting your mail flow as you observe how many of your messages pass or fail DMARC checks.
5. Test your DMARC Setup
Use DMARC testing tools like MXToolbox or Postmark’s DMARC checker to ensure your DMARC record is valid and visible. Send test emails to see how they are handled based on your DMARC settings.
6. Analyze Reports and Adjust your Setup
- Review the reports sent to the email specified in the
rua= tagof your DMARC record. These reports will give you insights into which of your emails are passing or failing SPF and DKIM checks. - Adjust your SPF, DKIM, and DMARC records based on these findings. Gradually move to a stricter DMARC policy (
quarantineorreject) as you become confident in the configuration.
7. As Always, Monitor and Maintain
Continuously monitor the performance of your DMARC setup and make necessary updates to your SPF, DKIM, and DMARC records to adapt to any changes in your email sending practices.