Blog
Pardot Pro Tips for Successful (and Scalable) B2B Email Marketing in Salesforce – Pt. 2!

By
Sara McNamara
Published Oct 19, 2020
Summary - Gain advanced insights with Sara McNamara's Pardot pro tips to elevate your B2B email marketing strategies in Salesforce.
Hey everyone! I hope you’re all doing well. I’m glad to be guest-posting for Knak again, and I’m back with more tips for creating awesome Pardot emails. After all, without in-person events to attend, I’m sure you’re fielding more marketing email requests than usual these days.
I’m going to continue where I left off in my last post and share some more Pardot pro tips for successful email marketing in Salesforce. Read on, and let’s discuss how to send better emails and use the insight you’re getting to improve your strategy.
Analyze bounce reasons from Pardot
Unfortunately, there is no great, high-level way to analyze bounce reasons in Pardot. In order to see why Prospects bounced, you’d need to view the bounce report and sift through what could be pages of bounces. And even that limits you to one send — you can’t get a cross-send bounce report.
That is, until you learn this trick — in Sales Cloud, you can leverage the Email Bounced Reason field in Salesforce Reports to splice and analyze bounce reasons across all marketing emails (note: because we are pulling the report in Sales Cloud, we can only analyze Prospects who are in Sales Cloud as Leads or Contacts).

So, how can you use this functionality? In the past, I’ve used it to view bounce reasons and bounce volume across specific accounts, as well as to diagnose potential technical issues with SPF or DKIM configuration.
Learn why people are unsubscribing from your emails
Too many companies put the basic CAN-SPAM/GDPR compliance in place and forget the power of understanding audience preference. If you put a simple form on your unsubscribe page, you can gain a tremendous understanding of why Prospects are unsubscribing.
- Is your opt-in language not clear enough?
- Did they think they’d be getting other types of emails when they signed up?
- Do they like your content but feel they’re getting too much of it?
If the solution for holding onto more Prospects is simply emailing them less, wouldn’t you want to know? That kind of insight is invaluable.
Luckily, this is relatively easy within Pardot:
- Create a Pardot form
- Style it as desired
- Copy the embed code
- Paste the embed code on your unsubscribe page template
- Add a sentence at the top to entice folks to submit their feedback

How to use Dynamic Lists as suppression lists
Pardot Dynamic Lists are powerful. They are the backbone of smart segmentation, organization, and even API architecture in Pardot.
You may have considered using Dynamic Lists for your master suppression list, competitor suppression list, and more, but it’s important to be aware of a few small things:
- In Pardot, when you run a list, you’ll receive an email when the list is fully run. Please note: If you haven’t received the confirmation email, the list may not be fully compiled.

2. If you’re trying to use a suppression list on a list email, make sure the list has been fully run before you hit “send.” If you don’t, the suppression list may be incomplete, and your email will go to the wrong people.
3. If you’re using a suppression list in an ongoing automated Engagement Studio program, make sure you have a change management policy in place for any changes to the suppression Dynamic List. You may even want to pause the Engagement Studio program while editing and re-running the list to make sure that anyone who should be suppressed isn’t overlooked because they qualified for the main nurture feeder list before the suppression list finished running.
Don’t get me wrong — Pardot Dynamic Lists are powerful. But with great power, comes great responsibility! Double check your process, and make sure you avoid errors.
Enable marketers while protecting your brand
Brand guardrails are critical. They keep your marketers from doing whatever they want in the emails they’re building, which prevents your emails from feeling like the wild west. Fortunately, there are a few simple ways to set brand guardrails in Pardot.
- If you’re looking to control the data, objects, or functionality that a marketer can view or edit, Pardot Roles is your friend! Use it to create custom roles that are tailored to your different marketer personas. This way, they have the functionality they need, but it’s limited enough to prevent data privacy or change management issues.
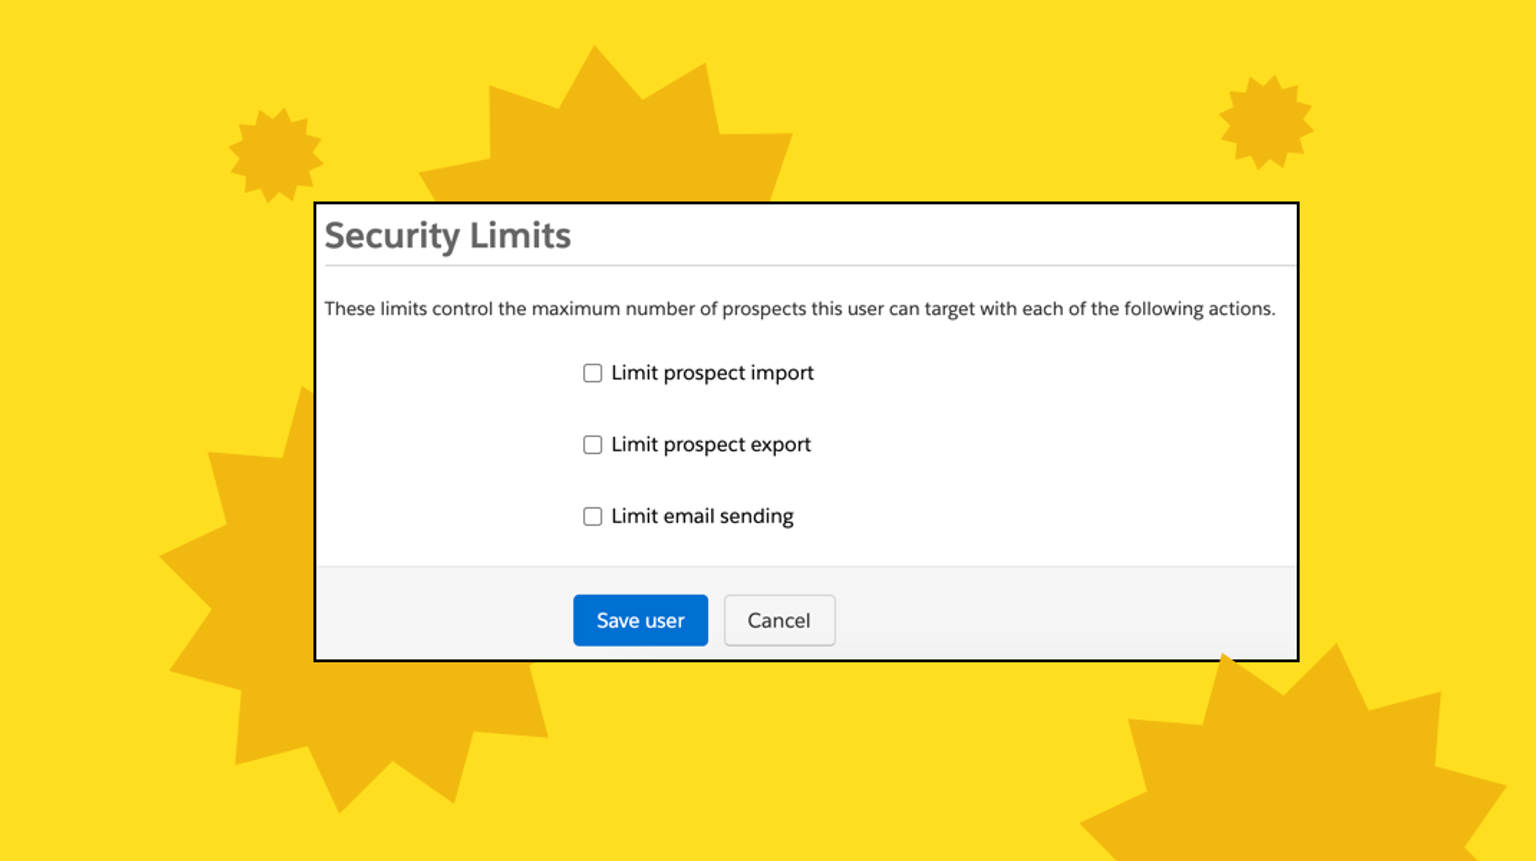
- If you’re concerned about marketers not waiting for their Dynamic Lists to fully load before they hit “send,” you can set security limits that will prevent them from sending an email to 1,000,000 people by accident. Interestingly enough, there is no limit to the number you can set, according to Salesforce….although the minimum value is 1.
- You can also limit how many prospects a user can import or export, which helps maintain data security in your organization and prevents users from going rogue to quickly import and send an email.
4. You’ll also want to set yourself or an appropriate team member up to receive Email Compliance notifications from Salesforce. That way, if someone makes it past your guardrails and sends an email with a delivery rate below 90%, you’ll have a chance to explain your company to Salesforce Email Compliance. Make sure you answer their email if you get one! It looks automated, but there is a real human being waiting for your response.
Another way to set strict brand guardrails is to use an email creation platform like Knak.
Knak uses customized branded modules to build emails, so once you’ve created modules that meet brand guidelines, anyone (really, anyone) can use them to easily create branded emails. It takes the guesswork out of branding and gives your Marketing Ops team better control without sacrificing creativity. More about that here.
Declutter the prospect view in Sales Cloud
Your sales team may not care if a lead or contact received an email. They just want to know if an email was opened or clicked.
Activity tracking on the Salesforce Lead and Contact page layouts is great, but what about the folks who don’t respond to your emails?
If you’re trying to bring a dead lead back to life with a re-engagement campaign, chances are that their activity view in Sales Cloud is full of “Email sent, Email sent, Email sent” lines, which is less than useful for Sales. This can even be a nuisance for active records, as it can add pages for Sales to flip through before they get to any real activity.
If you want to save Sales some grief, uncheck the setting called “Sync emails with the CRM” on the Salesforce and Pardot connector to remove the “Email sent” lines in their view so they can focus on higher value activities.
Don’t forget the preheader
Ever opened your email inbox, only to see an email like this?
When you have such little space to entice your recipients to open your email, every word counts. This is where the preheader comes in — the preheader allows you to control what shows up in the inbox line. Without one, Gmail and other ESPs just show alt text or the first few lines of your email instead of a compelling content hook.
Here is a great preheader. The content enhances the subject line and draws readers in:
Unfortunately, the old (and current, for some customers) Pardot Email Builder doesn’t have an easy way to insert preheader text, but if you’re using an email creation platform like Knak, there is a super simple way to add it in:
- Go to the “Preview Text” field
- Type in your preview text
Knak will even add in the required number of spaces so that no other text is inadvertently imported. More on that here.
Keep emails organized within Pardot
While many folks find Pardot easier to navigate than other marketing automation platforms, it goes without saying that the more emails you create and send in the platform, the harder it becomes to keep things organized.
I highly recommend utilizing Pardot’s Tags and Folders functionalities to keep things organized.
Tags – Many customers use Tags for easy views of specific categories. A great example is one Tag for each language.
Folders – Some customers use Folders for different geographies and years. The nice thing about Folders is that you can restrict access to certain users, which limits the content to the teams that actually need it and keeps the info away from the entire marketing team.
Some customers use both of these tools. In my opinion, the key is to leverage them in whatever way works best for you!
A more fundamental organizational idea is creating naming conventions. I seem to work for a lot of companies that use Jira for ticket management, so I love to include the Jira ticket number in my naming conventions. This is a great way to easily look back and get more context on an email that was sent, or, if you’re trying to analyze an email, you can find it easily by searching for the Jira number.
Create a nurture in Pardot using Engagement Studio
I could probably write an entire article on Engagement Studio, a very powerful Pardot tool that can be used for emails and much, much more.
When it comes to Engagement Studio, it’s important to understand the timing aspects of each step. Each type of wait has its own rules, which is important if you are sending emails. Salesforce has a helpful, detailed section on this in their Help Articles. I highly recommend bookmarking this resource for easy reference.
Some quick highlights to remember:
- You can set your program to send during business hours, but you can only choose one timezone. Therefore, you’ll want to create one Engagement Studio program for each timezone you want to target — and, of course, you have to know the timezone of each Prospect to achieve this.
- If you add someone to a list that feeds into an Engagement Studio program, let them go through a few steps, remove them from the feeder list, and then add them back, they will NOT start the Engagement Studio program over again. Pardot will remember which step they were on before they left, and will add them back — at the END of the wait on that step if the original schedule has passed.
This is why many Pardot Pros add a large wait step at the end of their Engagement Studio program (think a 365 day wait step that does something harmless, like adding a Tag). This way, if marketers want to add more emails to the program later, they can do so without having to resend the Prospect through the entire Engagement Studio program again.
- That’s right – you can send a Prospect through an Engagement Studio program more than once. This is a setting only an Administrator can turn on, and for good reason: In most cases, you do not want a Prospect to receive the same emails over again. This feature is more focused on other Engagement Studio use cases, or special cases where getting the emails again might make sense (like transactional emails, although Engagement Studio does not support bypassing “opt out” for transactional emails, so keep this in mind).
- You can only evaluate up to 5 conditions on a single rule statement. This sucks, but can be bypassed by creating Dynamic Lists that house most of the filters you need to apply to that rule statement step.

- Sometimes it’s a good idea to add steps that aren’t necessarily needed from a utilitarian standpoint, but that might make reporting easier for Marketers. A great example of this is having an email send step, then an email open evaluation step, and then an email CTA click evaluation step. This will make it easy for marketers to look at your program to see how many Prospects were sent the email, how much of the audience opened the email, and how many of them clicked the CTA in the email.
- For evaluation steps, you can only reference emails within your program. For example, you cannot send an email and then ask if the Prospect opened an older email from another program in the next step; you can only ask if they opened the email that was already sent within that exact Engagement Studio program.
- If no one becomes eligible to run through an Engagement Studio program for more than 30 days, the program automatically becomes inactive.
- If your Pardot instance has AMPSEA (Allow Multiple Prospects with the Same Email Address) turned on, you’ll want to be especially cognizant of the fact that if you have two lists feeding into an Engagement Studio and a Prospect is on both lists, removing them from one list will not be enough to disqualify them from the Engagement Studio altogether. Because they are still on the second list, they will still go through the program.
- If someone is opted out but exists on a feeder list, they will still go through the program; they just won’t receive any of the emails on the email steps. For this reason, if you want to be careful about reporting integrity, I would add a filter to disqualify any unsubscribed or hard bounced people from your program feeder list(s).
Pardot has a lot of great email tools and functionality, and the more that you learn the tiny rules and nuances, the more powerful they will become to you as an operator!
These are just a few tips that can help make your life in Pardot more successful and streamlined, but there are many more. Subscribe to the Knak newsletter and stay tuned for more Pardot tricks, or reach out to the email pros at Knak if you’re ready to enable your marketers to build their own emails while maintaining your compliance and QA sanity.And if you’re still trying to wrap your head around how you stack up, check out The Marketer’s Email Maturity Model from Knak. It covers the evolution of the email creation process so you can find the most efficient way to create incredible Pardot emails.